When applying for Canadian citizenship, one of the most important steps is submitting the correct photo that meets the official canadian citizenship photo requirements 2025. A simple mistake in your citizenship photo could delay your application or cause it to be rejected. Understanding the Canada citizenship photo requirements is crucial for ensuring your photo is accepted on the first try. In this guide, we’ll walk you through everything you need to know, from the specific photo dimensions to the rules on facial expressions and background color. Whether you’re preparing for your citizenship application or just need a quick refresher, this guide will help you navigate the process with ease.
Canada Citizenship Photo Requirements
What are the official Canada citizenship photo specifications?
When applying for Canadian citizenship, it’s essential that your photo meets the specific requirements set by Immigration, Refugees, and Citizenship Canada (IRCC). Failure to adhere to these photo specifications can result in delays or rejection of your application. Below are the detailed guidelines you need to follow for your Canada citizenship photo:
1. Photo Size and Dimensions
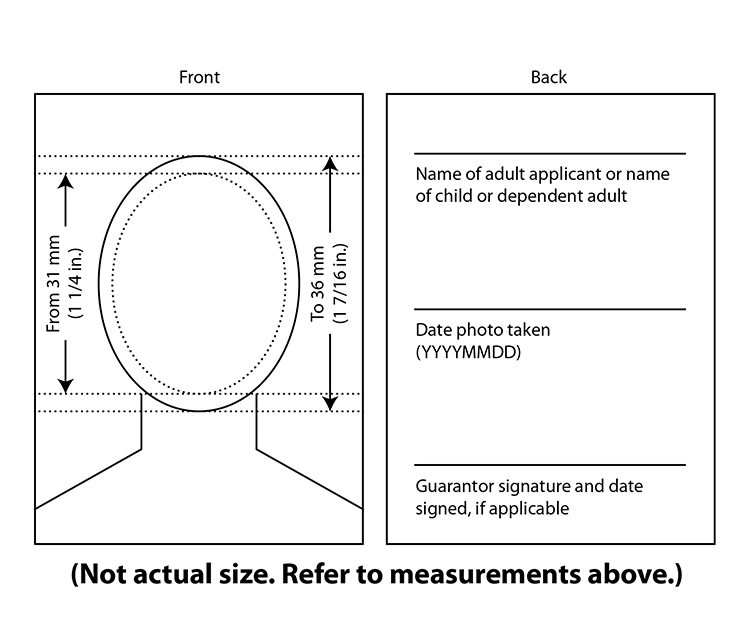
- Size: The photo must be 50mm x 70mm (2 inches wide by 2 3/4 inches high). This is slightly larger than the typical passport photo.
- Face Height and Position: Your head should be positioned between 31mm and 36mm (1 1/4 inches and 1 7/16 inches) from the bottom of the chin to the top of the head. This ensures the face occupies a sufficient portion of the photo for clear identification.
- Margin: There should be a space of at least 3mm on all four sides of the photo, ensuring the face is centered and unobstructed.
2. Background Color
- Neutral Color: The background must be a plain, light-colored, or white background with no patterns or shadows. This ensures that your face is easily distinguishable and provides the clearest contrast.
- No objects or shadows: Ensure that there are no objects, textures, or shadows visible behind you, as they can interfere with the photo’s clarity and compliance.
3. Lighting and Clarity
- Even Lighting: The photo must be properly lit, with no shadows on the face or in the background. You should avoid overly bright or dark lighting, which could distort your appearance. The light should come from the front, evenly illuminating your face.
- High Resolution: The photo should be clear and in focus, without any blurriness or pixelation. You must print the photo with high-quality resolution to ensure your facial features are sharp and distinguishable.
4. Facial Expression and Appearance
- Neutral Expression: You must have a neutral expression with your mouth closed and eyes open. Smiling or frowning is not permitted, as it can distort your facial features, making it harder for officials to accurately verify your identity.
- Eyes Visible: Your eyes must be clearly visible and not obscured by glasses, hair, or other items. If you wear glasses, ensure there’s no glare or reflection on the lenses, and avoid tinted or dark glasses.
5. Headwear and Accessories
- No Hats or Headwear (Except for Religious Purposes): If you wear a religious head covering, such as a turban, keep your face fully visible from the bottom of your chin to the top of your forehead, and ensure your facial features are clear. Headwear must not cast shadows or obscure any facial features.
- No Sunglasses or Tinted Glasses: Sunglasses or any tinted glasses are not allowed, as they obscure the eyes. If you wear prescription glasses, make sure the frames don’t block your eyes and that there’s no reflection on the lenses.
6. Photo Quality
- Print Quality: Ensure the photo is printed on high-quality photo paper. It should not be a photocopy or a digitally altered image.
- Digital Photos: If submitting a digital photo, it must meet the same criteria and be submitted in an acceptable file format (JPEG or PNG), with sufficient resolution (at least 600 x 800 pixels) to ensure clarity.
By adhering to these specifications, you’ll greatly reduce the chance of having your citizenship photo rejected. Remember, your photo is a key part of your citizenship application and plays a critical role in ensuring your identity is accurately verified.
Key Photo Guidelines for Canadian Citizenship Applications in 2025
When applying for Canadian citizenship in 2025, following the precise photo guidelines set by Immigration, Refugees, and Citizenship Canada (IRCC) is crucial. These guidelines ensure your photo is clear, accurate, and meets the government’s standards for identification. Below are the updated key photo guidelines you should follow for a successful citizenship application:
1. Recent Photo
- Date of Photo: Your photo must be recent, typically taken within the last 6 months. This is to ensure that your appearance is current and accurately reflects how you look at the time of your application.
- Why it matters: A photo taken too long ago may not accurately represent your current appearance, especially if there have been changes in your facial features due to aging, surgery, or other factors. An outdated photo can result in delays or a request to resubmit your photo.
2. Photo Format and Submission
- Print or Digital Photos: You can submit either printed photos or digital copies, depending on the format requested by IRCC. However, if you choose to submit digital photos, make sure they meet the specific digital file requirements outlined by the IRCC, such as file size, resolution, and format.
- Number of Photos: Typically, you’ll need to submit two identical photos. This is to ensure that at least one meets the standards even if there is an issue with one of the photos (e.g., poor print quality or defects).
3. Full Face and Front View
- Full Face Visibility: Your face must be clearly visible and occupy the majority of the photo. You must be facing the camera directly, with your full face in view and your head centered. Avoid tilted angles, as they can distort the proportions of your face and lead to rejection.
- No Obstructions: Ensure that your face is not covered by hair, glasses, or any other accessories. If you wear glasses, they must be clear with no glare or reflection on the lenses.
4. Neutral Expression with No Smile
- Facial Expression: As with all official Canadian identification photos (such as for passports), your expression must be neutral. This means no smiling, frowning, or raising your eyebrows. You should have your mouth closed and your eyes open, with no exaggerated facial expressions. A neutral expression helps maintain consistency and accuracy in facial recognition systems.
- Eyes Open: Your eyes must be fully visible and open, with no distractions or visible eye coverings like sunglasses. Ensure your eyes are clearly focused on the camera.
5. Proper Lighting and No Shadows
- Even Lighting: The photo must be taken in even lighting with no harsh shadows or lighting spots on your face. Shadows can obscure your facial features, making it difficult for officials to verify your identity.
- Avoid Overexposure or Underexposure: Bright lighting that causes overexposure or dim lighting that results in underexposure can alter your appearance. Aim for soft, balanced lighting that highlights your natural features.
6. Plain, Light-Colored Background
- Background Specifications: Your photo must have a plain, light-colored background (such as white or off-white) with no patterns or textures. The background should provide enough contrast to make your face stand out clearly.
- No Distracting Elements: There should be no objects, furniture, or other distractions in the background that could interfere with the photo’s clarity or professional appearance. Avoid natural backgrounds like trees, water, or any outdoor settings.
7. No Glasses or Accessories (Unless Medically Required)
- Glasses Guidelines: If you wear glasses, ensure they do not obscure your eyes, and avoid tinted or dark lenses. There should be no glare or reflections on the lenses. If your glasses are not necessary for your daily life, it’s best to take the photo without them.
- Headwear Guidelines: Headwear, such as hats or scarves, is not allowed unless it is worn for religious reasons. If you wear a religious head covering, it must not obstruct your face, and your facial features should be clearly visible from chin to forehead.
8. Digital Photo File Requirements (If Submitting Online)
- Digital Specifications: If submitting a digital photo as part of your online application, ensure the image file meets the IRCC’s size, format, and resolution requirements. Typically, the photo should be in JPEG or PNG format with a minimum resolution of 600×800 pixels.
- File Size Limitations: IRCC may set a maximum file size limit for digital photos. Be sure to check the latest guidelines for file size and resolution requirements to avoid rejection.
9. No Alterations or Retouching
- Natural, Unaltered Image: Your photo must be a natural representation of your current appearance. Do not digitally alter or retouch the photo to change any features. Alterations such as removing blemishes, adjusting skin tone, or changing lighting conditions can cause the photo to be rejected.
- Avoid Filters or Effects: Do not use filters, special effects, or any other modifications that could distort your appearance.
10. Additional Considerations for Children (If Applicable)
- Children’s Photos: If you’re applying for Canadian citizenship for a child, the same photo requirements apply. However, keep in mind that younger children may not be able to maintain a neutral expression. In such cases, IRCC will still accept a photo with a natural expression as long as other requirements, such as size and visibility, are met.
These updated guidelines for 2025 are crucial to ensuring your Canada citizenship photo is accepted without delay. Always double-check the latest specifications and, when in doubt, consider having your photo taken by a professional photographer who is familiar with IRCC standards.
Where can you get your Canada citizenship photo taken?
Getting your Canada citizenship photo taken properly is crucial to ensuring your application is accepted without delay. There are several places you can go to have your photo taken, and choosing the right location is key to meeting the official Canada citizenship photo specifications. Below are the most common places where you can have your photo taken:
1. Certified Photography Studios
- Why Choose Certified Studios: The best and most reliable option is to visit a professional photography studio that specializes in passport and citizenship photos. These studios are well-versed in the specific requirements set by Immigration, Refugees, and Citizenship Canada (IRCC) for photos. They are experienced in taking photos that comply with the photo size, background, and facial expression guidelines.
- Benefits of Certified Photographers:
- Accuracy: Certified photographers are familiar with the precise dimensions and guidelines for Canadian citizenship photos, reducing the chance of mistakes.
- Instant Processing: These studios often offer quick processing, so you can get your photos on the spot, making it a time-efficient choice.
- Guidance: If you’re unsure about any aspect of the photo, such as your attire or expression, a certified photographer can guide you to ensure your photo meets the specifications.
- Where to Find Certified Studios: Look for photography studios or retailers that advertise “passport” or “citizenship” photo services. You can also check if the studio has an official certification or partnership with government services.
2. Retail Stores and Photo Centers
- Large Retail Chains with Photo Services: Many large retail stores, such as Walmart, Costco, and Shoppers Drug Mart, offer photo services that include taking Canadian citizenship photos. These retail centers often have dedicated photo areas where you can have your photo taken by a professional or technician who knows the required guidelines.
- Benefits of Retail Photo Centers:
- Convenience: These locations are often more accessible and affordable than private photography studios, making them a popular option for many applicants.
- Quick Service: Photo centers in retail stores are typically designed to offer fast services, so you can get your citizenship photos in a short amount of time.
- Affordable Prices: Prices at retail stores for citizenship photos are generally competitive and more budget-friendly.
- What to Look for: Ensure the photo center explicitly states that they are familiar with and follow the official Canada citizenship photo guidelines. Some photo centers may advertise their compliance with government photo standards, which can reassure you that your photo will meet the necessary criteria.
3. Online Photo Services (for Digital Submissions)
- How It Works: Some websites offer online services where you can upload a photo of yourself, and they will adjust it to meet the Canada citizenship photo requirements. These services typically adjust the size, crop the photo, and make sure it follows the guidelines for submission.
- Benefits of Online Services:
- Convenience and Accessibility: You can take the photo at home, which can be a great option if you’re unable to visit a physical location.
- Guided Process: Many online services provide step-by-step instructions on how to take the photo yourself, making it easier for you to meet the requirements.
- Instant Delivery: Once the photo is processed, you can download the final image instantly or have it printed and shipped to you.
- Important Considerations: Online services are typically suitable for digital submissions, but you’ll need to ensure that the service you choose complies with IRCC standards. Some services may not be recognized by Canadian immigration authorities, so always confirm that they meet the official requirements before using them.
4. Pharmacies with Photo Services
- Pharmacies Offering Photo Services: Many pharmacies, including those with photo departments like Rexalland London Drugs, provide passport and citizenship photo services. These are often convenient, especially if you’re already visiting the pharmacy for other reasons.
- Advantages of Pharmacy Photo Services:
- Accessibility: Pharmacies are common in neighborhoods and are often open during extended hours, so they provide flexibility if you need your photo taken quickly.
- Affordable Options: Like retail chains, pharmacies typically offer competitive pricing for photo services.
- Quick Turnaround: Most pharmacies can provide you with the printed photos in a short time, typically within an hour or so.
- Important Notes: While pharmacy photo services are often reliable, always double-check with the staff to ensure they are familiar with Canada’s citizenship photo specifications. Some pharmacies may not always be up to date with the latest guidelines.
5. Specialized Photo Kiosks
- Self-Service Kiosks: In some locations, such as airports or malls, you may find self-service photo kiosks where you can take your own photo for Canadian citizenship. These kiosks are equipped with cameras and guidance screens that help you take your photo according to the required specifications.
- Pros and Cons of Photo Kiosks:
- Pros: Kiosks can be convenient and inexpensive, as they are available 24/7 in some locations. They also allow for immediate printing.
- Cons: These kiosks may not always meet the specific Canada citizenship photo guidelines, especially when it comes to lighting and facial expression. Therefore, they may not be the most reliable option, particularly if you want to ensure that your photo is compliant with IRCC standards.
6. Mobile Apps for Photo Adjustments
- Photo Editing Apps: Some mobile apps are available that allow you to adjust photos to meet Canadian citizenship photo requirements. These apps often provide tools to adjust dimensions, backgrounds, and alignment.
- Important Considerations: While these apps can help you make some adjustments to the photo, it’s important to remember that apps can’t always guarantee compliance with official requirements. If you opt for an app, ensure that the final photo meets all IRCC specifications. It’s often recommended to have the final photo verified by a professional before submission.
Final Thoughts on Choosing the Right Place
While there are various options for getting your Canada citizenship photo taken, visiting a certified professional photographer or a retail store with photo services is often the most reliable choice to ensure your photo meets all the necessary guidelines. Whether you choose a physical location or an online service, always verify that the provider is familiar with the official requirements, especially if you are opting for self-service or digital solutions.
By selecting a trusted service, you can avoid unnecessary delays in your citizenship application and ensure that your photo is accepted on the first submission.
How to Ensure Your Canada Citizenship Photo is Accepted
Common Mistakes to Avoid When Submitting Your Citizenship Photo
Submitting the correct photo is one of the most important parts of your Canadian citizenship application. Even small mistakes in your photo can lead to delays or a rejection of your application. To ensure your citizenship photo meets all the necessary requirements and gets accepted on the first submission, avoid these common mistakes:
1. Incorrect Photo Size or Dimensions
- Mistake: One of the most common reasons for photo rejection is submitting a photo that doesn’t meet the required size or dimensions. The IRCC specifies that the photo must be 50mm x 70mm, with specific measurements for the face and head positioning.
- How to Avoid It: Always make sure that your photo is printed to the correct size. Double-check the photo’s dimensions before submission, especially if you’re using a photo printing service or a digital app. Many certified photographers will automatically ensure the correct size for you, so consider visiting a professional photographer if you’re unsure.
2. Using an Outdated Photo
- Mistake: Submitting a photo that is too old can lead to rejection. IRCC requires that your photo be recent, typically taken within the last six months, to accurately reflect your current appearance.
- How to Avoid It: Have your photo taken as close to your application date as possible. Avoid using old passport or visa photos, even if they appear to be similar to your current appearance. A photo that’s older than six months can result in delays as IRCC will likely ask for a new one.
3. Incorrect Facial Expression
- Mistake: A photo with a smile, raised eyebrows, or an exaggerated facial expression can be rejected. The IRCC requires a neutral facial expression with your mouth closed and your eyes open.
- How to Avoid It: Maintain a natural, neutral expression when having your photo taken. Ensure your mouth is closed and there is no visible emotion in your face. Avoid frowning, smiling, or any exaggerated expression that could make it harder for officials to verify your identity. Simply look straight ahead with your eyes open.
4. Poor Lighting or Shadows
- Mistake: Photos that have harsh lighting, shadows on the face, or uneven brightness are often rejected. Shadows can obscure facial features and make it difficult to verify your identity.
- How to Avoid It: Make sure your photo is well-lit with even lighting. Avoid any direct light or overexposure, and ensure the light source is not coming from the side or behind you, as this can cast shadows. The best lighting is soft and even, illuminating your face from the front to avoid shadows.
5. Using Glasses with Glare or Reflections
- Mistake: Wearing glasses with glare or reflections on the lenses can block your eyes and lead to rejection. Tinted or dark glasses are also not allowed, as they obscure the eyes.
- How to Avoid It: If you wear glasses, remove them before taking your citizenship photo if possible. If you need to wear glasses for medical reasons, ensure there is no glare or reflection on the lenses. Use non-reflective lenses if possible, and make sure your eyes are clearly visible. If you have to wear glasses, confirm with the photographer that they won’t obstruct your eyes.
6. Incorrect Background
- Mistake: The background of your citizenship photo should be plain, light-colored, and neutral. Photos with busy backgrounds, patterns, or shadows can be rejected as they can distract from the face.
- How to Avoid It: Choose a plain white or off-white background with no objects, textures, or other distractions. Make sure there are no shadows or lighting spots in the background. A neutral, simple background ensures that your face is the focal point of the image.
7. Wearing Headwear (Unless for Religious Reasons)
- Mistake: Wearing hats, scarves, or other headwear (unless for religious reasons) can obscure your facial features and result in a photo rejection.
- How to Avoid It: If you wear headwear for religious purposes, it must not cover any part of your face, including your forehead, chin, or ears. Your facial features should be clearly visible from chin to forehead. If you’re not wearing headwear for religious reasons, remove any hats or coverings before taking your photo.
8. Digital Photo Quality Issues
- Mistake: Submitting a digital photo that is blurry, pixelated, or poorly edited is a common mistake. The IRCC requires that digital photos be of high quality to ensure clarity and accurate facial identification.
- How to Avoid It: If you’re submitting a digital photo, make sure it is clear, sharp, and unaltered. The image should be high resolution with no pixelation, blurriness, or edits (such as changing facial features or smoothing skin). The photo must meet the IRCC’s resolution and file format requirements, typically 600 x 800 pixels in a JPEG or PNG format.
9. Photos Taken in the Wrong Format
- Mistake: Using a photo that does not meet the IRCC’s required format or specifications, such as the wrong size, shape, or orientation, can lead to rejection.
- How to Avoid It: Make sure the photo is formatted according to IRCC guidelines. This includes ensuring it is in the correct orientation (portrait, not landscape), the proper file type (if submitting digitally), and the right dimensions. Always check the guidelines before submitting your photo to ensure it meets the required standards.
10. Submitting a Photocopy of the Photo
- Mistake: Submitting a photocopy of your photo instead of an original print can lead to rejection. IRCC requires original prints for physical photo submissions.
- How to Avoid It: Always submit original prints of your photo when applying for Canadian citizenship. If submitting digitally, make sure that the image is the original digital file, not a photocopy or a scan of a printed photo.
Final Thoughts on Avoiding Common Mistakes
To avoid delays and complications in your Canadian citizenship application, it’s essential to carefully follow all photo requirements and guidelines. Pay attention to the size, facial expression, background, lighting, and other specifications. If you are in doubt, visit a professional photographer experienced in taking photos for citizenship or passport applications. By avoiding these common mistakes, you can ensure that you process your application smoothly and without unnecessary delays.
Checklist for Preparing Your Photo for Submission
Ensuring that your Canada citizenship photo meets the official requirements is crucial for the success of your application. To help you navigate the process, here is a comprehensive checklist for preparing your photo for submission. Follow this checklist carefully to avoid delays and ensure your photo is accepted by the Immigration, Refugees, and Citizenship Canada (IRCC).
1. Ensure the Photo is Recent
- Date of Photo: The photo must have been taken within the last six months. An outdated photo may not accurately represent your current appearance, which could delay or hinder your application process.
- Action: If you are unsure of the date of your last photo, it’s best to take a new one to avoid any issues.
2. Check the Photo Dimensions
- Required Size: The photo must be 50mm x 70mm (2 inches wide by 2.75 inches tall) in size. Make sure the photo meets these dimensions, as the IRCC has strict requirements on photo size.
- Face and Head Dimensions: The face in the photo should measure between 31mm and 36mm from chin to crown. The head must be centered in the image.
- Action: Measure the printed photo or ask the photographer to verify that it meets the required size and that the face is correctly positioned.
3. Confirm a Neutral Expression and Eyes Open
- Facial Expression: Your face should have a neutral expression, with no smiling, frowning, or raised eyebrows. Your mouth must be closed, and your eyes should be open and clearly visible.
- Action: Maintain a neutral expression while having the photo taken. Make sure your eyes are not closed, and avoid any exaggerated facial features.
4. Verify the Background
- Plain and Light-Colored Background: The background of the photo must be plain and light-colored—preferably white or off-white. There should be no patterns, textures, or shadows in the background.
- Action: Ensure the photographer uses a plain, neutral-colored backdrop with even lighting. Avoid outdoor or busy environments as they might distract from your face.
5. Avoid Glasses or Accessories (Unless Necessary)
- Glasses: If you wear glasses, ensure they are non-tinted, non-reflective, and do not obscure your eyes. Remove glasses if possible for a clearer photo. If your glasses have glare or reflections, this could make the photo unacceptable.
- Headwear: Headwear is only allowed for religious reasons, and even then, it must not cover any part of your face. Ensure that your entire face, from chin to forehead, is clearly visible.
- Action: If you wear glasses, remove them unless medically required. If you wear headwear for religious reasons, make sure it doesn’t block your face.
6. Check the Photo’s Lighting
- Even Lighting: The lighting must be even with no harsh shadows on your face. Bright lighting may lead to overexposure, while dim lighting may cause underexposure, making it difficult to see your facial features clearly.
- Action: Ensure that there are no shadows or reflections on your face. The photographer should use soft, diffused light to illuminate your face without any glares or dark spots.
7. Face and Head Positioning
- Full Face Visibility: The photo must show your face directly facing the camera, with your head centered in the image. Avoid tilting your head to the side or looking down or up.
- Action: Position yourself so that your head is centered and facing the camera straight on. Ensure your face occupies most of the frame, but not to the point of cropping out parts of your face.
8. Verify the Quality and Clarity
- Photo Quality: The photo must be clear, with no pixelation, blurriness, or distortion. It must be of high resolution so that facial features are visible and recognizable.
- Action: Check the photo for any signs of blurriness or pixelation. Ensure the image is sharp, with no noise or digital alterations.
9. Review the Photo File Format (for Digital Submissions)
- Digital Submissions: If you’re submitting your photo digitally, ensure the file is in JPEG or PNG format. The file should also meet the IRCC’s required resolution (minimum 600 x 800 pixels) and file size limitations.
- Action: If submitting online, ensure your digital photo meets the resolution and format requirements. Do not alter the photo with filters or retouching.
10. Ensure No Alterations or Retouching
- No Digital Edits: The photo should be a natural representation of your current appearance. Avoid using filters, retouching, or editing to change your facial features, skin tone, or lighting.
- Action: Ensure the photo is a true and accurate representation of how you look, without any digital alterations or enhancements.
11. Submit Original Prints or Digital Copies (as Required)
- Original Prints: If submitting physical photos, only original prints are acceptable. Photocopies or scanned copies of photos will not be accepted.
- Action: Make sure you submit original printed photos. If you are submitting a digital photo, ensure it is the original file and not a copy or scan of a printed photo.
12. Take Multiple Photos (If Necessary)
- Consider Multiple Options: If you’re unsure about the first photo, take a few additional ones to choose from. It’s always good to have multiple photos in case one is rejected.
- Action: If you have doubts about your first photo, take a few more to ensure at least one meets all the requirements.
Final Thoughts on the Checklist
By following this comprehensive checklist, you can be confident that your Canada citizenship photo will meet the strict standards set by IRCC. Paying attention to detail when preparing your photo is essential for ensuring your citizenship application is processed quickly and without delays. If you ever doubt, visit a certified photographer who knows the IRCC’s photo requirements to make sure they take your photo correctly the first time.
Importance of Using a Professional Photographer
While it’s possible to take your Canada citizenship photo on your own or visit a retail photo center, using a professional photographer who specializes in passport and citizenship photos can significantly increase your chances of submitting a perfect, compliant photo. Here’s why opting for a professional photographer is a smart choice:
1. Expertise in Meeting Official Requirements
- Understanding IRCC Guidelines: Professional photographers who specialize in passport and citizenship photos are experts in the official photo requirements set by Immigration, Refugees, and Citizenship Canada (IRCC). They understand the nuances of photo size, background color, head positioning, and facial expression, ensuring that every detail meets the necessary standards.
- Action: By choosing a professional photographer, you can be confident that your photo will adhere to the stringent guidelines of the IRCC, reducing the chances of your photo being rejected and delaying your application process.
2. Correcting Common Photo Mistakes
- Avoiding Frequent Errors: Common photo mistakes—such as incorrect lighting, improper background, or positioning issues—are easily corrected by an experienced photographer. A professional will know exactly how to adjust the lighting, set up the right background, and ensure your head is properly aligned.
- Action: Professionals are adept at spotting and correcting potential mistakes before the photo is taken, saving you the time and frustration of having to retake it if it doesn’t meet the requirements.
3. Proper Lighting and Background
- Controlled Lighting Setup: One of the key elements in taking a compliant citizenship photo is ensuring the lighting is even and free of shadows or glares. Professionals use specialized lighting setups to avoid any harsh shadows or reflections, which can make the photo unacceptable.
- Background Setup: A professional photographer will provide a plain white or off-white background—the type recommended by the IRCC—without any distractions. Ensuring the background is clear and neutral is crucial to meeting the guidelines, as anything else could result in your photo being rejected.
- Action: The controlled studio environment provided by a professional ensures consistent lighting and background, both of which are key to a successful submission.
4. Perfecting Head Position and Expression
- Facial Expression: A neutral expression is a critical requirement for Canadian citizenship photos. While it may seem simple, getting the correct facial expression—no smiling, raised eyebrows, or frowning—can be difficult. A professional photographer will help guide you to achieve this without any unintended expressions.
- Head Positioning: The IRCC has very specific guidelines about how your head should be positioned in the photo, including the alignment of your face to the camera. A professional photographer will make sure you are centered properly and that your face takes up the correct amount of space in the frame.
- Action: A professional photographer will provide guidance on posture and positioning, ensuring that your face is clear, centered, and positioned according to the required specifications.
5. High-Quality Image
- Clarity and Resolution: A professional photographer will ensure that the image is high-quality, with no blurriness, pixelation, or distortion. Low-quality photos can result in delays or rejection, especially for digital submissions. Professionals use high-resolution cameras to capture clear, sharp images that meet the IRCC’s requirements.
- Action: By using a high-quality camera and ensuring the proper resolution, a professional photographer guarantees that your photo is sharp, detailed, and meets the necessary standards.
6. Handling Special Requirements (for Glasses, Headwear, etc.)
- Glasses and Reflections: If you wear glasses, professional photographers are skilled at positioning you in a way that minimizes reflections or glare from the lenses, ensuring your eyes are clearly visible. For digital submissions, this is especially important as glare can result in a photo rejection.
- Headwear and Religious Considerations: If you need to wear headwear for religious reasons, professional photographers will ensure it does not obscure any part of your face and complies with the IRCC’s rules. They are familiar with the specific guidelines around headwear and can assist you in positioning yourself to ensure your photo is accepted.
- Action: A professional photographer will work with you to ensure that glasses and headwear do not interfere with the clarity of your face, ensuring compliance with the requirements.
7. Faster Processing and Avoiding Retakes
- Efficiency: Professional photographers know exactly what the IRCC requires, so they can take your photo in a way that is likely to pass on the first submission. This helps you avoid the hassle of retaking your photo if you reject it due to mistakes.
- Action: Since professionals are familiar with the requirements, they can process your photo quickly and ensure that it meets the standards, saving you time and effort in the long run.
8. Convenience and Confidence
- Peace of Mind: Visiting a professional photographer eliminates the guesswork of trying to meet all the technical specifications on your own. You don’t have to worry about measuring the photo size, ensuring the correct background, or checking the lighting. The photographer takes care of all the details for you.
- Action: With a professional photographer, you can submit your photo with confidence, knowing it’s up to the high standards required by the IRCC, and avoid the risk of delays or rejections due to photo issues.
9. Additional Services (Optional)
- Extra Copies: Many professional photographers provide extra printed copies of your photo for a small additional fee, which can be useful in case you need to submit multiple applications or keep a copy for your records.
- Digital Version: If you need a digital version of your photo for online submission, a professional photographer can provide you with a high-quality digital file that meets the IRCC’s specifications.
- Action: Consider asking your photographer for additional copies or a digital version of the photo to streamline your application process.
Additional Tips for a Successful Canada Citizenship Application
How Canada Immigration Photo Requirements Affect Your Application Process
The photo you submit as part of your Canada citizenship or immigration application may seem like a minor detail, but it can have a significant impact on the speed and success of your application. Meeting the Canada immigration photo requirements is essential, as failure to comply can lead to delays, additional paperwork, or even the rejection of your entire application. Here’s how the photo requirements affect your application process and why it’s crucial to get them right from the start.
1. Photo Non-Compliance Can Lead to Rejection
- Impact: One of the most immediate effects of submitting a non-compliant photo is that your application could be rejected. The Immigration, Refugees, and Citizenship Canada (IRCC) has very strict guidelines regarding the quality, size, and content of your photo. If your photo does not meet these specifications, IRCC will send your application back to you, asking for a new photo.
- Action: A rejected application means a delay in processing time and potentially needing to resubmit your application entirely. This can lead to months of unnecessary waiting, particularly if you are applying for citizenship or a visa under time-sensitive circumstances. Submitting the right photo the first time ensures your application proceeds without delay.
2. Delays in Processing Time
- Impact: Even if your application is not outright rejected, a non-compliant photo can cause delays in the processing time of your application. IRCC may request that you submit a new photo, which can extend the overall timeline of your application by several weeks or months.
- Action: If your application is delayed due to photo issues, it can affect your plans for travel, work, or family reunification, especially if you were counting on a prompt decision. Ensuring your photo is in full compliance with IRCC’s guidelines means your application will be processed in a timely manner.
3. Increased Chances of Additional Documentation Requests
- Impact: In some cases, if there are issues with your photo, the IRCC might request additional documentation or clarification before proceeding with your application. This adds extra steps and requires more of your time and effort.
- Action: If your photo does not clearly reflect your current appearance, or if it is of poor quality, the IRCC might need further verification of your identity. This can result in additional interviews or requests for supporting documentation, which can be both time-consuming and stressful.
4. Difficulty in Matching Your Identity
- Impact: The primary purpose of the photo in your application is to help the IRCC and other Canadian authorities verify your identity. If your photo is unclear, poorly lit, or does not accurately represent you, it may be harder for officials to match your photo with your personal records, potentially causing complications in the verification process.
- Action: A poorly taken photo may lead to confusion during the identity verification process, especially if you’re submitting applications that involve biometrics, fingerprinting, or interviews. A compliant photo ensures that your identity can be easily verified, allowing for smoother processing and approval.
5. Compliance with Changing Guidelines
- Impact: Immigration photo requirements are periodically updated by the Canadian government to ensure they meet evolving technology, security standards, and identification procedures. If your photo does not meet the most recent guidelines, it may be rejected even if it was compliant at the time it was taken.
- Action: Staying up-to-date with current Canada immigration photo requirements is crucial. Failure to follow the latest guidelines could lead to issues, even if you took the photo in good faith based on outdated information. Professional photographers who are familiar with the latest regulations can ensure your photo is up-to-date and meets the current standards.
6. Impact on Multiple Applications
- Impact: Many applicants for Canadian citizenship, permanent residence, or other immigration processes are also applying for other official documents like visas, passports, or work permits. If you reject your photo for one application, it may cause delays across all your applications, especially if you use the same photo for multiple documents.
- Action: If you’re applying for multiple Canadian documents or other services, it’s important to ensure that your photo is compliant for all potential uses. A delayed or rejected photo for one application could impact your ability to proceed with others, adding stress and further delays to your overall immigration process.
7. How to Minimize Impact: Get It Right the First Time
- Impact: Submitting an incorrect or non-compliant photo doesn’t only delay the process but also adds to your stress. Submitting the right photo the first time helps avoid these setbacks and ensures that your application moves forward without interruption.
- Action: Take proactive steps to ensure your photo complies with IRCC’s photo specifications. Consider using a professional photographer familiar with Canadian immigration photo guidelines, as this will reduce your chances of making common mistakes and improve the likelihood that they will accept your photo on the first attempt.
8. Risk of Missing Important Deadlines
- Impact: If your photo is rejected or needs to be resubmitted, this can cause delays that may cause you to miss important deadlines for permanent residency status, citizenship certificate, citizenship ceremonies, or other immigration-related events. A missed deadline may affect your eligibility or delay your status change.
- Action: To avoid missing critical dates, make sure to double-check your photo before submission and confirm that it meets all IRCC guidelines. Submitting the right photo on time allows you to process your application without any delays that could affect your immigration timeline.
Conclusion
Submitting the right photo is a crucial part of your Canada citizenship application. By ensuring that your photo meets the Canada immigration photo requirements, you can avoid unnecessary delays and potential rejection, helping to keep your application on track. However, the photo is just one component of the process. From meeting eligibility criteria to preparing your documents and taking the citizenship test, every step is important.
To ensure you process your application smoothly and quickly, take the time to understand all the requirements and consult professionals when necessary. Whether you choose to take your photo yourself or enlist the help of a professional photographer, following the guidelines for your photo will help set you up for success.
With a complete, accurate application and the right photo, you’ll be well on your way to becoming a Canadian citizen. Best of luck as you navigate this exciting journey toward Canadian citizenship!
Visit the IRCC website for more informations.